换脸,即为使用算法将图片中的人脸替换成另一张脸。
这里我们来使用python dlib模块来实现换脸。
获取人脸特征点
首先我们需要安装dlib,安装过程请参考之前的文章,
然后,我们下载人脸的68个特征点的检测器(shape_predictor_68_face_landmarks.dat)
链接: https://share.weiyun.com/EPZZJfNs (密码:BLFc)
我们新建一个名为"model"的文件夹,将解压后的dat文件放进去。
再新建一个名为"faces"的文件夹,准备好两张都只带有一个人脸的图片,将其放进去。
编写代码,获取人脸68特征点:
import cv2
import dlib
import numpy as np

predictor_path='model/shape_predictor_68_face_landmarks.dat'#检测器数据集位置
face_path='faces/'#人脸图片目录
detector = dlib.get_frontal_face_detector()
predictor = dlib.shape_predictor(predictor_path)

class TooManyFaces(Exception):
    pass

class NoFace(Exception):
    pass

def get_landmark(image):
    face_rect = detector(image, 1)
    if len(face_rect) > 1:
        print('Too many faces.We only need no more than one face.')#人脸数量超过一个
        raise TooManyFaces
    elif len(face_rect) == 0:
        print('No face.We need at least one face.')#图片中找不到人脸
        raise NoFace
    else:#得到人脸位置
        print('left {0}; top {1}; right {2}; bottom {3}'.format(face_rect[0].left(), face_rect[0].top(), face_rect[0].right(), face_rect[0].bottom()))
        return np.matrix([[p.x, p.y] for p in predictor(image, face_rect[0]).parts()])
调用get_landmark函数即可获取人脸的特征点数据。
脸部调整
图片中的人脸可能会有不同的倾斜度和不同的位置。所以,我们需要把人脸进行调整。
def transformation_from_points(points1, points2):#计算图片转化过程
    points1 = points1.astype(np.float64)
    points2 = points2.astype(np.float64)#将输入矩阵转换为浮点数
    c1 = np.mean(points1, axis=0)
    c2 = np.mean(points2, axis=0)#矩心
    points1 -= c1
    points2 -= c2#每一个点集减去它的矩心
    s1 = np.std(points1)
    s2 = np.std(points2)#标准偏差
    points1 /= s1
    points2 /= s2#每一个点集除以其标准偏差

    U, S, Vt = np.linalg.svd(points1.T * points2)#Singular Value Decomposition
    R = (U * Vt).T#计算旋转部分

    return np.vstack([np.hstack(((s2 / s1) * R, c2.T - (s2 / s1) * R * c1.T)), np.matrix([0., 0., 1.])])
    #仿射变换矩阵(Affine transformations)

def warp_image(image, M, dshape):#进行调整
    output_image = np.zeros(dshape, dtype=image.dtype)
    cv2.warpAffine(image, M[:2], (dshape[1], dshape[0]), dst=output_image, flags=cv2.WARP_INVERSE_MAP, borderMode=cv2.BORDER_TRANSPARENT)
    return output_image
参考 (维基百科):
正交普氏问题(Singular Value Decomposition):
https://en.wikipedia.org/wiki/Orthogonal_Procrustes_problem
仿射变换矩阵(Affine transformations):
https://en.wikipedia.org/wiki/Transformation_matrix#Affine_transformations
获取人脸掩模
我们可以使用一个掩模(mask)来表示人脸的位置,属于人脸的区域像素值为1,不属于人脸的区域像素值为0。
将原图片乘以掩模,就可以得到人脸,而其余区域像素值为0;
将原图片乘以1−mask,即人脸区域会是0,其余区域会保留下来。
上面这两个结果相加,既可以实现初步的换脸。
#人脸特征点器官的对应点
FACE_POINTS = list(range(17, 68))
MOUTH_POINTS = list(range(48, 61))
RIGHT_BROW_POINTS = list(range(17, 22))
LEFT_BROW_POINTS = list(range(22, 27))
RIGHT_EYE_POINTS = list(range(36, 42))
LEFT_EYE_POINTS = list(range(42, 48))
NOSE_POINTS = list(range(27, 35))
JAW_POINTS = list(range(0, 17))
OVERLAY_POINTS = [
    LEFT_EYE_POINTS + RIGHT_EYE_POINTS + LEFT_BROW_POINTS + RIGHT_BROW_POINTS,
    NOSE_POINTS + MOUTH_POINTS,
]
FEATHER_AMOUNT = 11

#绘制凸包
def draw_convex_hull(img, points, color):
    points = cv2.convexHull(points)
    cv2.fillConvexPoly(img, points, color)

#获取人脸掩模
def get_face_mask(img, landmarks):
    img = np.zeros(img.shape[:2], dtype=np.float64)
    for group in OVERLAY_POINTS:
        draw_convex_hull(img, landmarks[group], color=1)
    img = np.array([img, img, img]).transpose((1, 2, 0))
    img = (cv2.GaussianBlur(img, (FEATHER_AMOUNT, FEATHER_AMOUNT), 0) > 0) * 1.0
    img = cv2.GaussianBlur(img, (FEATHER_AMOUNT, FEATHER_AMOUNT), 0)
    return img
颜色校正
受到光照、肤色等因素的影响,换脸后看起来显得十分不自然。
因此我们使用高斯模糊来校正颜色:
COLOUR_CORRECT_BLUR_FRAC = 0.6
LEFT_EYE_POINTS = list(range(42, 48))
RIGHT_EYE_POINTS = list(range(36, 42))

def correct_colours(im1, im2, landmarks1):
    blur_amount = COLOUR_CORRECT_BLUR_FRAC * np.linalg.norm(np.mean(landmarks1[LEFT_EYE_POINTS], axis=0) -
            np.mean(landmarks1[RIGHT_EYE_POINTS], axis=0))
    blur_amount = int(blur_amount)
    if blur_amount % 2 == 0:
        blur_amount += 1
    im1_blur = cv2.GaussianBlur(im1, (blur_amount, blur_amount), 0)
    im2_blur = cv2.GaussianBlur(im2, (blur_amount, blur_amount), 0)
    im2_blur += (128 * (im2_blur <= 1.0)).astype(im2_blur.dtype)
    return (im2.astype(np.float64) * im1_blur.astype(np.float64) / im2_blur.astype(np.float64))
使用im2除以im2的高斯模糊,再乘以im1来校正颜色。这种方法也只能从一定程度上校正颜色,有时反而会出现副作用。
如果太小,第一个图像的面部特征将显示在第二个图像中;反之过大,内核之外区域像素被覆盖,并发生变色。这里的内核用了一个0.6x的瞳孔距离,COLOUR_CORRECT_BLUR_FRAC可自行调整。
进行换脸
将以上函数进行组合调用,主函数代码如下:
import os,glob

SCALE_FACTOR=1
ALIGN_POINTS = (LEFT_BROW_POINTS + RIGHT_EYE_POINTS + LEFT_EYE_POINTS +
RIGHT_BROW_POINTS +NOSE_POINTS + MOUTH_POINTS)

def main(path1,path2):
    path1 = os.path.join(face_path, path1)
    path2 = os.path.join(face_path, path2)
    img1 = cv2.imread(path1, cv2.IMREAD_COLOR)
    img1 = cv2.resize(img1, (img1.shape[1] * SCALE_FACTOR,
            img1.shape[0] * SCALE_FACTOR))
    img2 = cv2.imread(path2, cv2.IMREAD_COLOR)
    img2 = cv2.resize(img2, (img2.shape[1] * SCALE_FACTOR,
            img2.shape[0] * SCALE_FACTOR))
    landmark1 = get_landmark(img1)
    landmark2 = get_landmark(img2)

    transformation_matrix = transformation_from_points(landmark1[ALIGN_POINTS], landmark2[ALIGN_POINTS])
    mask = get_face_mask(img2, landmark2)
    warped_mask = warp_image(mask, transformation_matrix, img1.shape)
    combined_mask = np.max([get_face_mask(img1, landmark1), warped_mask], axis=0)

    warped_img2 = warp_image(img2, transformation_matrix, img1.shape)
    warped_corrected_img2 = correct_colours(img1, warped_img2, landmark1)
    warped_corrected_img2_temp = np.zeros(warped_corrected_img2.shape, dtype=warped_corrected_img2.dtype)
    cv2.normalize(warped_corrected_img2, warped_corrected_img2_temp, 0, 1, cv2.NORM_MINMAX)

    output = img1 * (1.0 - combined_mask) + warped_corrected_img2 * combined_mask
    cv2.normalize(output, output, 0, 1, cv2.NORM_MINMAX)
    cv2.imshow("out", output.astype(output.dtype))#展示最终结果
    cv2.waitKey(0)
    cv2.destroyAllWindows()
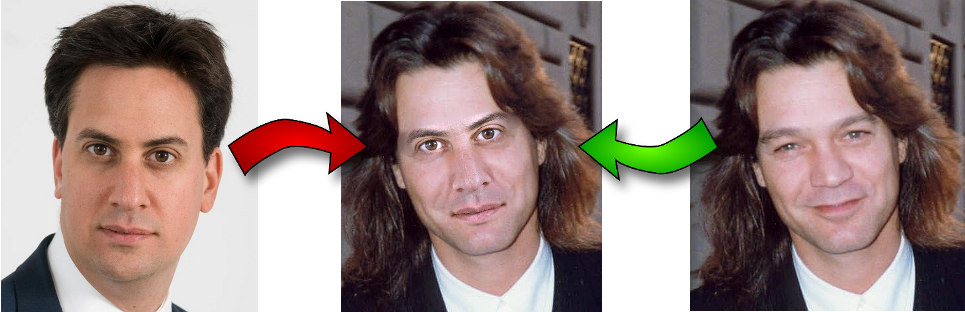
然后,我们调用此函数即可实现换脸操作。
例如faces文件夹下有两个图片1.jpg和2.jpg,调用main("1.jpg","2.jpg")即可把1.jpg的人脸换成2.jpg中的人脸。
详细请参考Github上的https://github.com/matthewearl/faceswap 项目
 如要进行视频换脸,则是进行逐帧替换,多张人脸的替换请自行完善。